How to Check If Your IP Is Leaking: A Three-Step Self-Check with ip-api, ipinfo and ip111
Bottom line: running one IP-check website cannot confirm you are "not leaking." The exit, its type, and leaks are three separate layers. Check the exit, check the type, then check for leaks, combining ipinfo, ip-api, ip111 and ipleak in that order, and get one solid data point per layer before you judge. Each step takes a minute or two. Finish the checks inside your environment before running any accounts; that saves far more than diagnosing after the fact.
The proxy shows as connected and pages load normally. Then after running for a while, the account still runs into trouble. Most people suspect the proxy first. But before blaming the proxy, it is worth clearing up the IP layer itself. Three things actually need checking: whether the exit is the one you configured; what attributes that exit carries in the platform's eyes; and whether the browser is leaking real information through other channels. Each question calls for a different tool. MostMate is a fingerprint browser with proxy checking and exit verification built into environment management. Below, we break it down as: run the third-party tools once, then use the in-app entry for daily checks.
Exits, types, and leaks are three separate things, and one website cannot show them all
An IP-check website can only answer "who is my exit". The other two questions are beyond it. Treating a single lookup as proof that isolation is in place is the most common blind spot in self-checks.
Risk systems look at at least three layers.
- The first layer is exit ownership. The IP's country, city, and ASN should match the account's identity.
- The second layer is exit attributes. The same IP range can be residential broadband or datacenter, and datacenter ranges carry different weight in risk models than residential ones.
- The third layer is bypass leaks. WebRTC can probe the machine's real public address directly from the browser. DNS resolution may bypass the proxy and take the system default channel. IPv6 can expose you outright on links where only IPv4 is proxied. These channels all connect around the proxy.
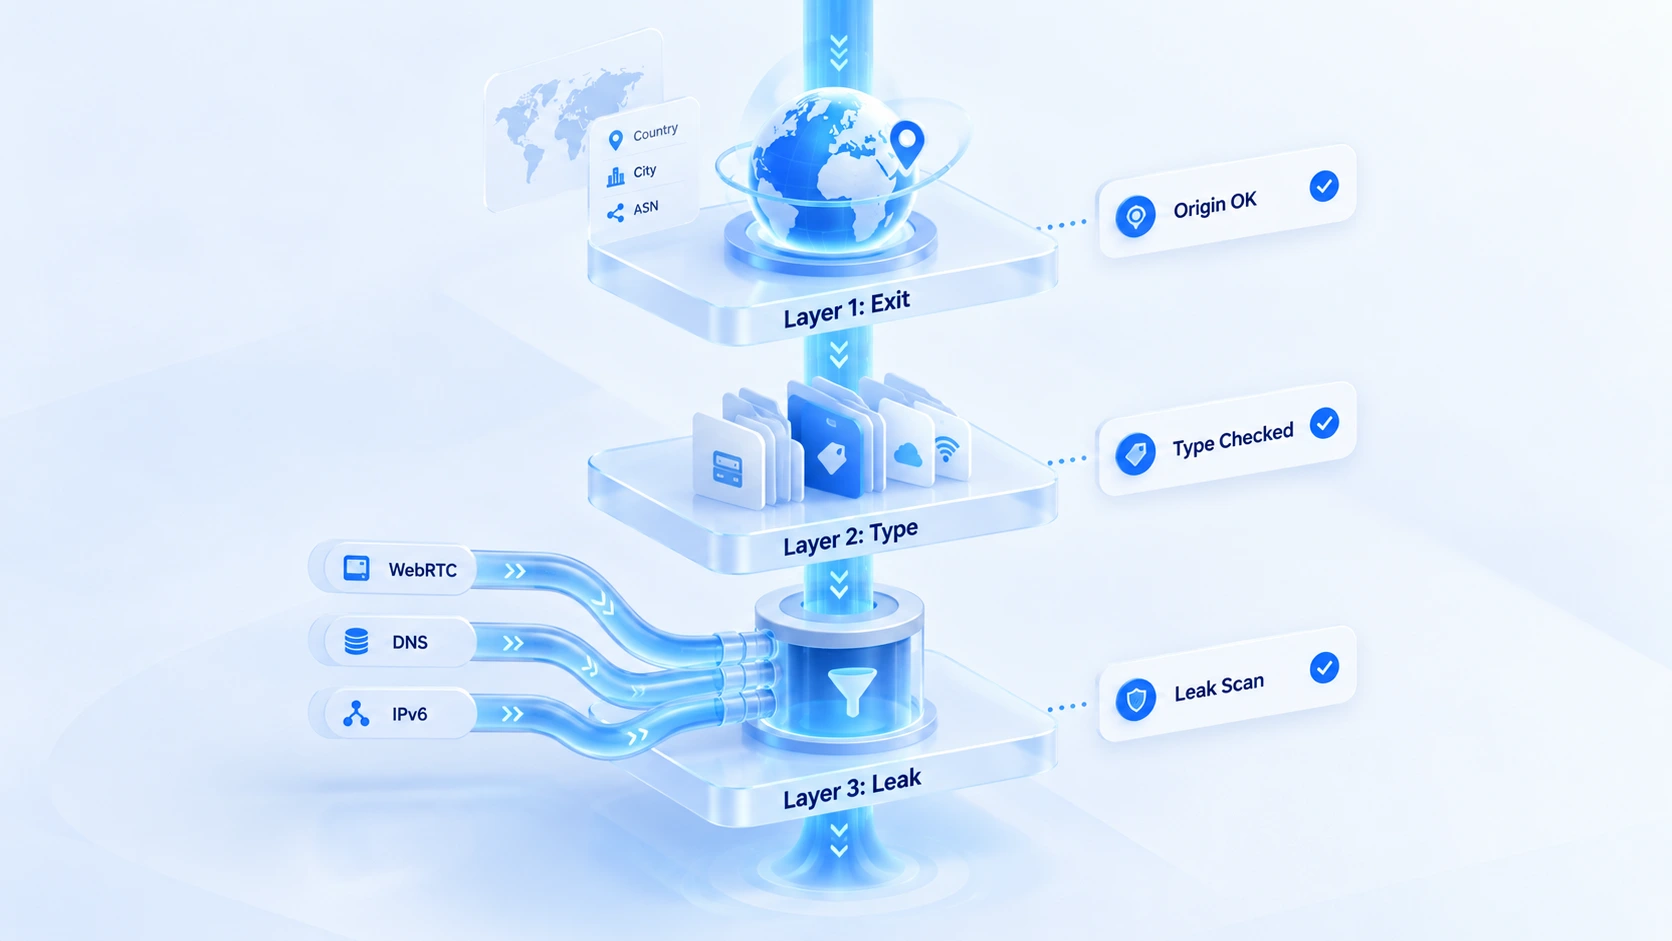
Each layer needs its own data, so each tool covers one. Go in order.
The three-step self-check workflow
Run all three steps inside the environment. A test from your own browser measures your own network and says nothing about the environment.
1. Step one: check exit ownership with ipinfo. Open ipinfo.io inside the environment; the page shows the current exit's geolocation, organization, and ASN. Compare each item against what your proxy provider claims: whether the country and city match, and whether the organization is the one the provider advertises. Note any discrepancy in the environment's notes and cross-check it in step two. Different databases index the same IP range at different speeds. A single provider's result is not a conclusion.
2. Step two: judge exit attributes with ip-api. Open ip-api.com directly in the browser and it returns a JSON payload. The proxy and hosting fields are the attribute verdict. hosting = true means the IP belongs to a datacenter or server farm; proxy shows whether it has been flagged as a proxy. Most proxies run on datacenter ranges, so hosting = true is normal. The field's value is that it tells you how the platform sees your exit; whether that fits your account's business is for you to judge based on the business itself.
3. Step three: check bypass leaks with ip111 and ipleak. ip111.cn reports your exit once each from a domestic site, a foreign site, and Google. Normally all three results match and point to the same proxy line. ipleak.net adds three more panels: WebRTC, DNS, and IPv6. If any panel shows an address other than your proxy, a bypass leak exists. Residential ISP ranges deserve particular attention here. To dig deeper into this layer, the guides on DNS leak detection and IPv6 leak detection each contain complete troubleshooting steps.
Three steps produce three verdicts: is the exit right, what its attributes are, and whether the bypass is clean. A problem in a different step points in a completely different direction. That is exactly why you check them separately instead of lumping them together.
Make the checks routine: MostMate's proxy verification entry
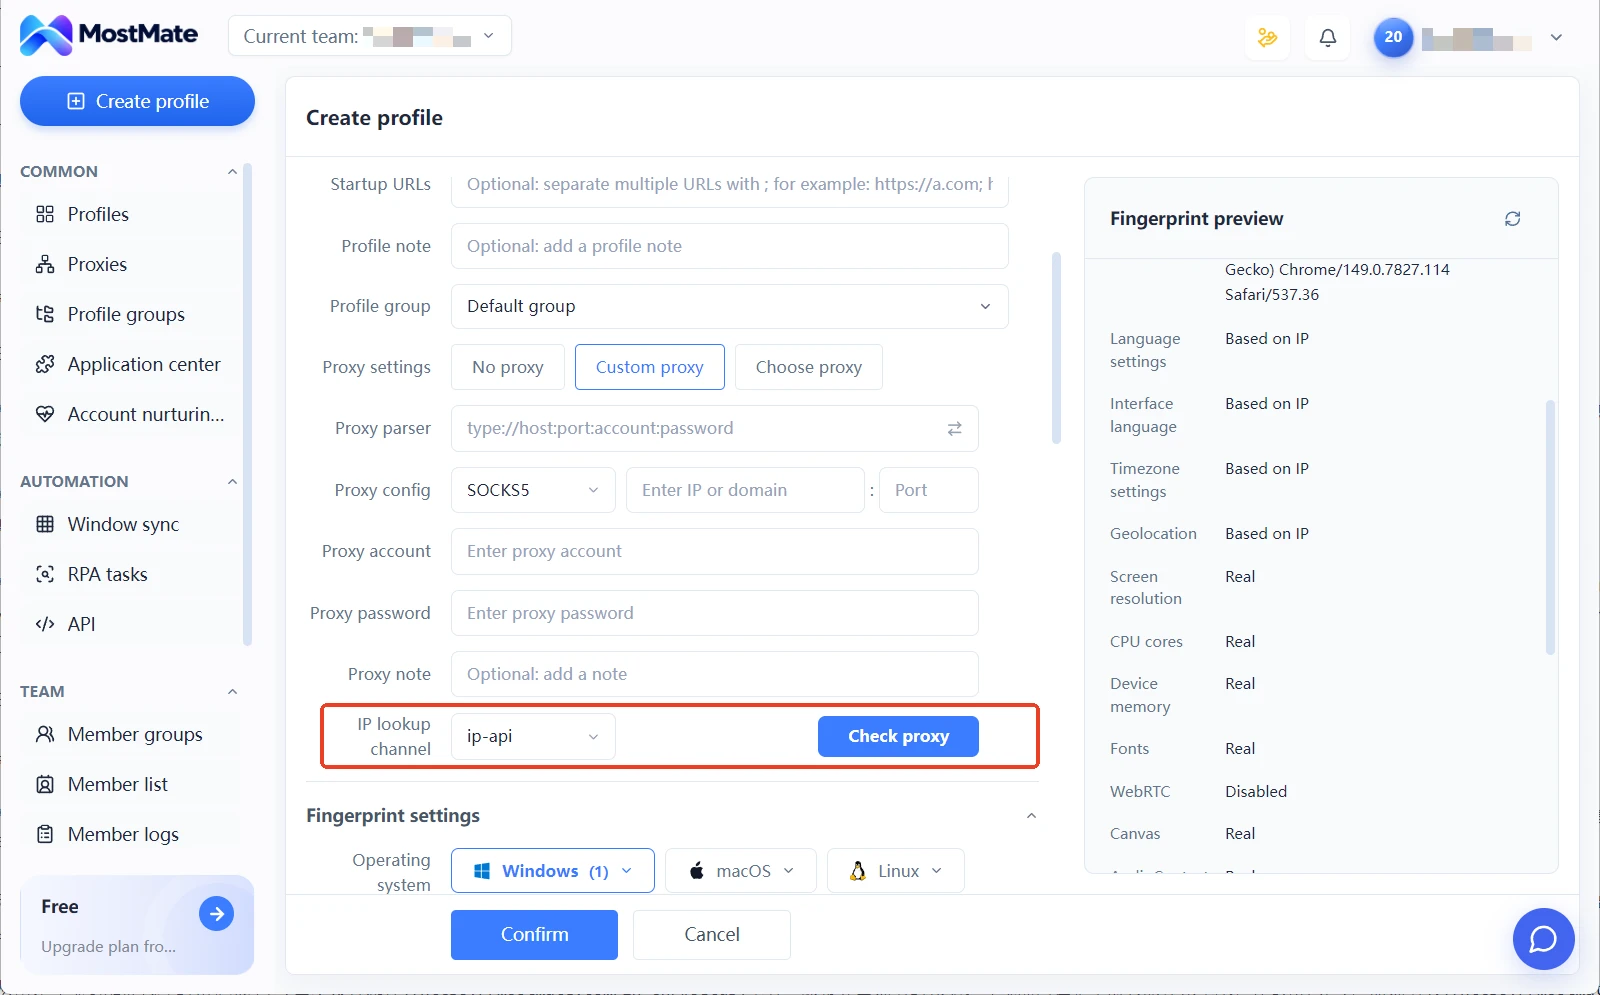
Third-party tools suit the deep check you do when adding a proxy; for daily verification, the fixed entry inside the environment is faster. MostMate's proxy form includes a [check channel]; the default sample channel is ip-api. Once the proxy is configured, click [Check proxy], and the environment tests the exit through the selected channel and fills in the result. This step never leaves the environment.
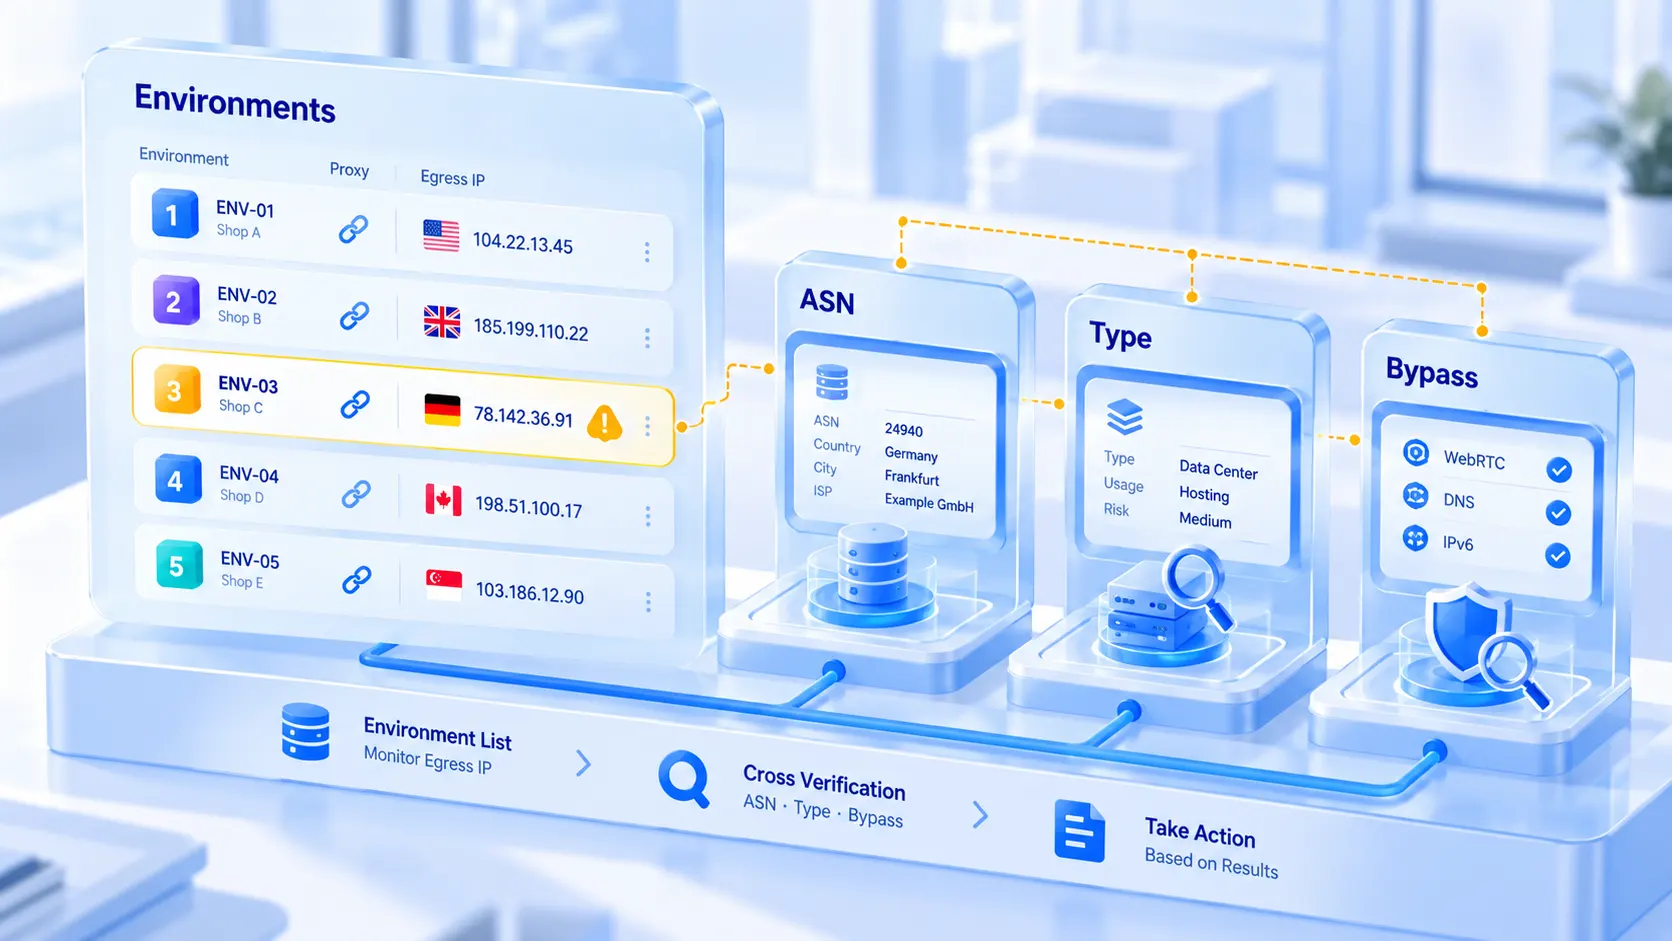
Every environment in the list carries two columns: proxy and exit IP. Which line serves which environment, and which region the current exit lands in — one pass over the list settles it, no need to open environments one by one. In the environment parameters, language, timezone, and location default to aligning with the exit IP. Once the exit is set, there is nothing left to fill in by hand, removing one more source of misalignment.
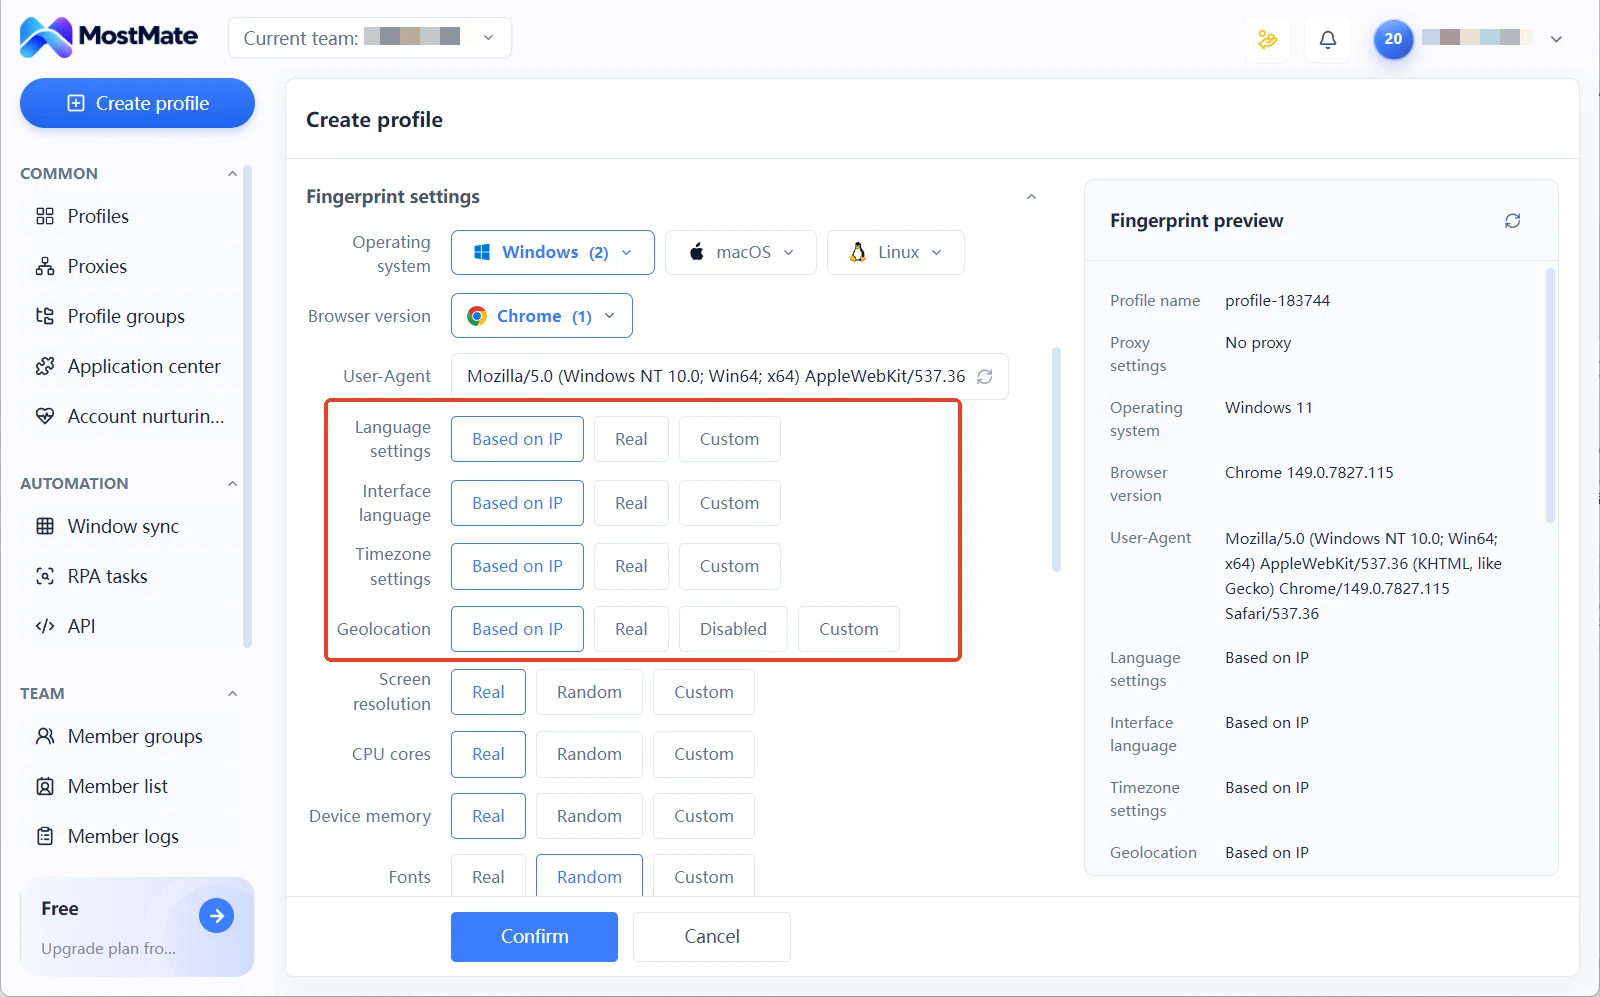
For the complete sequence from creating an environment to configuring a proxy, the four-step setup walkthrough includes a preview with interface notes. For the role environment isolation plays in the overall anti-association system, the product overview page covers it in full.
Reading the results: three common misreads and your check rhythm
Treat any anomaly as unconfirmed until it survives cross-checking; each of the three common misreads has its own handling path.
Database discrepancies: the same IP shows one city in ipinfo and another in ip-api. Usually the two databases simply index at different paces. Judge by the more stable fields. If both agree at the country level, you can keep using it. Log city-level differences in the environment's notes. If they persist across several inspection rounds, contact the provider to verify.
Datacenter attributes: hosting = true does not mean the exit is unusable. It only says the IP belongs to a datacenter; it is not a ban flag. The real trade-off is how the exit's attributes fit the business type. Running a business that is sensitive to IP quality on a datacenter range carries a completely different order of risk than running one that is not. Whether to keep using it depends on your business requirements, not on this single field.
Bypass leaks: the only one of the three that needs immediate action. If the WebRTC or DNS panel shows an address other than your proxy, first go back to the environment and confirm the proxy is genuinely active. Then review how WebRTC is handled; the guide on WebRTC settings in fingerprint browsers explains how to configure it by scenario. Re-test after fixing, and resume business only when the panels come back clean.
Set the check rhythm around three moments. When a new proxy tests clean and is added, run all three steps in full. After changing a proxy or adjusting environment settings, re-run step three. For daily inspection, watch the exit IP column in the environment list for drift. If the exit region changed and no one touched the configuration, that alone is a lead. For a fixed inspection routine, the guide on proxy exit maintenance provides a ready-made checklist.
To add detection at the browser fingerprint layer, the BrowserLeaks 11-check walkthrough breaks each item down in three groups: exit, reading, and declaration.
Closing thoughts
The value of an IP self-check is not in how many websites you run. What matters is having data on each of the three layers: exit, attributes, and leaks. Then judgment has grounds and fixes have direction. If you are about to open a new environment or switch to a new proxy, get the three-step flow working before running any business. For environments already running, use the in-app exit IP column for daily checks and return to third-party tools when something looks off. Download MostMate to keep proxy checking, exit verification, and fingerprint configuration in one environment manager. The self-check turns from an ad-hoc chore into a fixed routine.
FAQ
Is ip-api free?
Web queries are free. Open it directly in a browser and you can see the full response, including the attribute fields. It also offers an API service; the free tier has rate limits. Follow the official page's notes for batch queries.
What if ip111 shows three different exit IPs?
When the three directions point to different addresses, different routes are leaving through different exits. The usual cause is split-routing rules or a global proxy that does not cover all traffic. Go back to the environment, confirm the proxy configuration's coverage, and re-test until all three results match.
How should a WebRTC leak be handled?
First confirm the proxy is genuinely active in the environment, then check how WebRTC is handled. After fixing, return to ipleak and re-test; the issue is only solved when the panel no longer shows your local ISP's ranges. Browser extensions that restrict WebRTC are not reliable; handling it at the environment layer is safer.
If all three steps pass, is the account definitely safe?
No. IP is only one group among many correlation signals. Browser fingerprint, cookies and login habits, account behavior patterns — all of it falls within the platform's risk-control scope. The three-step self-check covers the network layer; isolation at the fingerprint layer depends on the environment itself. Only when both layers are in place does correlation risk truly start to shrink.

MOSTMATE
Secure Multi-Account Management, Made Simple
Start with your first account and use MostMate to build safer, smarter, and more efficient multi-account operations.
- Independent profiles. Consistent identities.
- AI Automation · Account Health · Team Operations